Italian Poutine

Italian Poutine

Posted by Brian David-Marshall | Kitchen Table Gaming

Poutine… Italian style? We dress up the french fries favorite “consumed by drunken people” late at night with a classy Kitchen Table Gaming version

The origin of Italian Poutine is pretty similar to that of the Elvis Banana Pudding. Except it takes place across a couple of days instead of decades and across international borders instead of mere blocks.

I was having lunch in Renton on a visit to the Wizards of the Coast offices with former New Yorkers Elaine and Kieren Chase. We were eating at Red House which is easily the best food within a reasonable radius of the offices. There is a tremendous food scene in Seattle but it has not quite made it to Renton. That said Red House is excellent and I always look forward to their polenta fries appetizer. I always think about how to make the food I am eating and it occurred to me that I have rarely, if ever, deep-fried anything. I opened up a mental folder for polenta fries and went about my business.

A couple of days later I was in Vancouver for Pro Tour Magic Origins and it was impossible to not see, hear, smell, or generally think about poutine. Poutine is a dish where French fries are put under the broiler with cheese curds and brown gravy and consumed by drunken people late at night. In Brooklyn growing up we called them disco fries and they could feature cheddar, American, or mozzarella cheese with brown gravy.

I had found my mission for the polenta fries and once I thought about using a tomato confit in place of the gravy I knew I would be making this immediately upon getting into my kitchen. You may not want to go through all the steps I have here and you could certainly use a jarred tomato sauce but you could also forgo the polenta and just make the confit. There is little in this world better than these tomatoes on a wide pasta like a tagliatelle with some pine nuts and shaved Parmesan cheese.

Ingredients

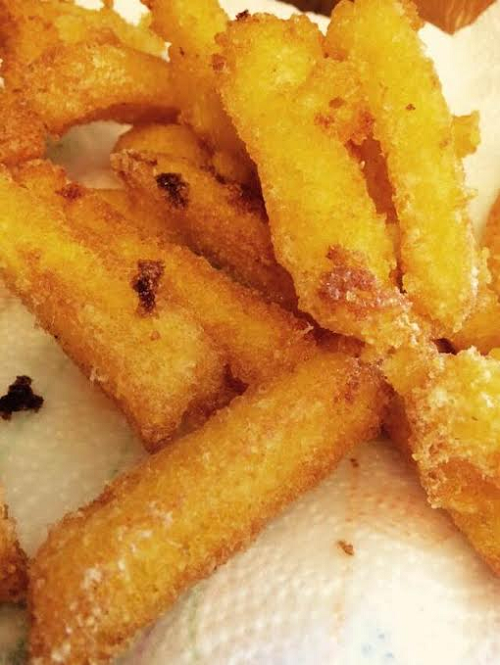
Prepared polenta cut into sticks
Vegetable or canola oil for deep frying

6 medium heirloom tomatoes
10 cloves peeled garlic
Olive oil to cover
Salt

1 cup shredded mozzarella cheese
1/2 cup crumbled insalata ricotta

Handful fresh torn basil leaves
1/3 cup toasted pine nuts

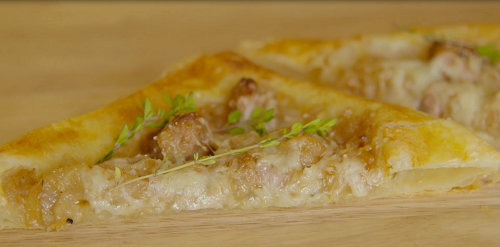
Let’s Make Some “Poutine”

Slice the stem ends off of the tomatoes and make an “X” incision in flesh on bottom. Blanch tomatoes in a pot of boiling salted water and remove after two minutes and shock them in a large bowl of water and ice. When they have cooled peel the skin off and place each tomato sliced side down into a deep oven proof baking dish (you may need additional tomatoes to fill dish). Nestle the garlic cloves down in between tomatoes, sprinkle with salt and cover with olive oil. Cook dish for 2 hours at 250 degrees. Scoop tomatoes and garlic into a bowl and mash into sauce with a fork.

Heat your frying oil to 365 degrees and in small batches fry the polenta sticks until they are a dark golden brown. Transfer to paper towel lined plate and add salt. When all the “fries” are ready arrange them in an oven proof dish and spoon some of the sauce onto them. Top with the mozzarella and insalata. Spoon a little of the tomato oil over the mound of cheese. Place the dish under the broiler and let the cheese get browned and bubbly. Top dish with torn basil and pine nuts and serve in the baking dish.

Elvis Banana Pudding

Elvis Banana Pudding

Posted by Brian David-Marshall | Food, Kitchen Table Gaming

I LOVE Magnolia Bakery’s Banana Pudding. Yes the place is super touristy and is in the regular rotation for the Sex in the City bus tours that infest New York… but that pudding! I have been obsessed with it since the first time I tried it and historically I have never cared much for that desert. I was more than a little shocked when I found out how easy it is to make. If you look on the back of a Nilla Wafers box (an essential component to ANY banana pudding) you will find one that is roughly 1000 times more complicated and not nearly as good.

Many, many years ago I would go to a West Village restaurant called David’s Potbelly and one of the items on their menu was an Elvis Burger. It was a plump, juicy burger topped with a generous dollop of creamy peanut butter, sliced ripe bananas, and some crispy bacon. It was a perfect burger and something of a problem for me at 200 AM after a full day of normal meals to top off with a midnight snack befitting the King himself.

Anyway… Magnolia Bakery is not far from where the ghost of David’s Potbelly haunts my waistline. I was walking by there fully immersed in a pint of creamy non-Elvis’ed banana pudding and it struck by an almost religious vision. I should do unto the pudding as was done unto that burger.

This is the result…

Ingredients

14 oz can sweetened condensed milk
1 1/2 cups ice cold water
Small box (3.4 oz) instant vanilla pudding mix
8 tablespoons of PB2 (dehydrated peanut butter powder)
1 tsp of Kosher salt
6-8 thick slices of bacon
1/3 cup dark brown sugar
3 cups heavy whipping cream
Box Nilla Wafers
4 sliced bananas

Time to Make the Pudding

In the bowl of a mixer, beat sweetened condensed milk, PB2 and water for about a minute. Add the pudding mix and mix for two to three more minutes. Strain into a smaller bowl to remove lumps of PB2, cover, and refrigerate for at least 4 hours (or overnight) so the mixture can set up.

Place a wire rack on a baking sheet and lay out strips of bacon and sprinkle with brown sugar. Bake in a preheated 400 degree oven for around 20 minutes or until bacon is crispy and sugar has caramelized. Allow to cool and reserve bacon for later.

In a large bowl on medium speed, whip the heavy cream until stiff peaks form — I put my metal mixing bowl and whisk mixer attachment in the freezer for five minutes prior…the cream always whips up very quickly this way. Using a rubber spatula, gently fold in the pudding mixture until fully combined and no streaks of pudding are visible.

In a large bowl, layer wafers, bananas, and pudding. Ideally, you want three layers but if you go with a larger baking dish you might only have two. Top with a liberal sprinkling of the chopped bacon. Cover tightly with plastic wrap and refrigerate for about 8 hours before serving. It is actually best about 48 hours after being made.

S'mores to Plowshares

This is a top down cookie design. I had the name in mind before I knew exactly what the cookie would turn out to be. I wanted to capture the cinnamon-grahaminess, the toasted marshmallow, and the gooey chocolate bar quality of the cookout treat. While I normally don’t use Hershey’s chocolate as my chunk of choice in my other cookies I knew they were essential for this recipe. I found that the snack sized bars broke into perfect little identifiable pieces. I managed to find a whole wheat graham flour and made my first attempt that included molasses and nutmeg in the recipe. I also mixed the marshmallows into the cookie dough.

While the first attempt was semi-successful the cookie came out too gingerbready with the spice from the molasses and the nutmeg. More critically, the marshmallows that were inside the cookie just evaporated into nothing and undermined the structural integrity of the cookies. These were not load-bearing cookies.

For this second take I just went entirely with brown sugar, instead of using a combination of molasses, white sugar, and brown sugar, and eliminated the nutmeg. I also froze my mini marshmallows and placed them on the surface of the cookie since those were the only ones that survived from the original batch. I froze them first to give them just a little more time in the oven to maintain their shape throughout the baking process.

They turned out exactly the way I wanted and i look forward to making them again on an upcoming episode of Kitchen Table Gaming.

S’mores to Plowshares Cookies
(Makes 12 large cookies)

Ingredients:

2 sticks unsweetened butter
1 1/2 cup dark brown sugar
1 large egg
1 cup all purpose flour
1 1/4 cup whole wheat graham flour
1 teaspoon Kosher salt
3/4 teaspoon baking powder
1/4 teaspoon baking soda
4 teaspoon ground cinnamon
1 teaspoon vanilla extract
12 snack size Hershey’s Special Dark chocolate bars
60 frozen mini-marshmallows

Time to make the cookies:

Preheat your oven to 350 degrees.

In a stand mixer with the paddle attachment whip together softened butter and brown sugar for 2 to 3 minutes. Add in the egg and let the mixer go for 7 or 8 minutes, scraping down the sides with a rubbed spatula as you go. Add in all the dry ingredients and vanilla and mix until combined.

Using a 1/3 cup ice cream scoop portion out 12 cookies onto cookie sheets lined with parchment or Silpat baking mat. The cookies will spread out considerably while baking so you can only fit 6 per sheet. Flatten the scoops gently with the palm of your hand so they are 1/2″ thick discs. Break each of the snack size chocolate bars into four pieces and nestle them into the top of each cookie. Press four to five of the frozen marshmallows in as well.

IMG_5176

Chill the cookies in the refrigerator for 30 minutes or freezer for 10 minutes before putting them in the oven for 18 minutes. Transfer cookies to a wire rack to cool — but not too cool as you they are best eaten with slightly gooey chocolate and marshmallows. You can reheat the cookies for 5 to 10 seconds to in a microwave oven to get that gooey S’mores sensation back.

Onion and Sausage Tart

(This dish has its roots at a long ago gaming marathon when a small group of us (including Paul Yellovich who helped me relay this story on the first episode of Kitchen Table Gaming) played the Judge Dredd board game for more than the span of 24 hours. When we were done playing we had eaten everything there was to eat in Paul’s house and had less than $13 to muster between us. (It stands to reason that if we could stay up all night playing games we did not have jobs at the time.)

That money was spent on a stack of frozen pizzas, a package of hotdogs, a bag of Sabrett’s red hotdog stand onions, and a two-liter bottle of off brand root beer. In the end we would decide that the best way to consume our bounty was by rolling up the hot dogs and onions inside the cooked pizzas and washing the mess down with the soda. When I set out to update this recipe for KTG I was stumped until I saw a package of Dufour Puff Pastry peeking out from the back of my freezer.)

I like to make my recipes from as-scratch as possible but have not been willing to take the dive into making my own Puff Pastry yet. Especially when the Dufour brand one is so perfect. Lots of the bigger name brand versions use vegetable shortening but this one is made the way Julia Child intended — with real butter. I am sure you can use whatever Puff Pastry is available to you and this will be yummy but I get the Dufour at Whole Foods and it is totally worth going out of your way for and should in no way be limited to making this.

Puff pastry is a perfect vehicle for any number of savory and/or sweet foods from making personal Beef Wellingtons to apple tarts. I have done appetizers for more than a few family gatherings with it and never repeated a recipe twice. We had great heirloom tomatoes at the market last summer and I topped my pastry with thin slices of them nestled in an arugula pesto. Another time I made a fig and olive tapenade which was layered on puff pastry with thin fig slices and dotted with goat cheese.

Here is what I did to make these tarts but you should not let my imagination limit you any way:

Root Beer Caramelized Onion and Sausage Tart

Ingredients

4 thinly sliced Vidalia Onions (or any sweet onion if Vidalias are not available)
1 lb of Italian Sausage removed from its casing
6 oz pure cane sugar Root Beer.
2 tablespoon Honeycup brand honey mustard (sorry to be so brand specific with this recipe but I am addicted to this ingredient)
1 package Dufour Classic Puff Pastry
2 cups shredded gruyere cheese
1 cup shredded pecorino romano cheese
2 teaspoon chopped thyme (fresh or dried)
2 tablespoon olive oil
1 large egg beaten with 1 tablespoon of water
Salt and pepper

Cut and pastry

Preheat oven to 400 degrees.

In a sautee pan cook the sausage over medium-high heat and break it up into smaller crumbles with a wooden spoon as you cook it. Remove pan from heat and set aside. In another, larger pan start cooking the onions in the olive oil with some salt and pepper. Whisk together the root beer and honey mustard. When the onions start to soften and turn translucent you can add them to the pan and toss the onions to coat. Continue cooking until the mixture has reduced and begun to caramelize with the onions. Add the sausage, pan drippings, and thyme and stir until they are all incorporated. Remove from heat and set aside.

Flour your work surface and lay out the chilled puff pastry. With a floured rolling pin you can quickly smooth out any of the folds and then cut into six even pieces with a sharp paring knife. Place your pastry pieces on a silpat or parchment lined baking sheet and dock the center area with a fork. This will ensure that the sides will puff up but the center will provide a nice flat basin for your topping. You can also take trimmings of the puff pastry and “build” four walls, using a little egg wash as glue, along the perimeter of the pastry for an even more dramatic boxy presentation.

Spoon the sausage and onion mixture into the center of the pastry and top with the two cheeses. Brush the edges of the pastry with the egg wash and put the tray in the refrigerator to chill again for about 30 minutes. It is essential for puff pastry to be cold when it goes into the oven so that the many layers of butter are not melting together. I have gone ahead and not rechilled my puff pastry with mixed results in the past.

Bake the chilled tarts in the oven for 22 to 25 minutes or until the pastry is golden brown and firm to the touch. A little fresh grated cheese never hurt anyone when serving.

Serves 6 to 12 depending on whether or not you slice these in two. Sometimes it serves 3.

Sushi Grade Nachos

(“Sushi Grade Nachos” is another one of three recipes from the first episode of Kitchen Table Gaming, published earlier this week, here on Fetchland.)

I am pretty lucky to have an insane Japanese supermarket near my house that not only carries Japanese produce but also has a pretty ridiculous selection of cheap, fresh seafood that they will slice up for you into perfect pieces of sashimi. I have gotten a whole tray of otoro (fatty) tuna there for less than one piece of otoro sashimi at high end restaurants in New York.

I have no idea what led to the creation of these individually plated nachos but it certainly started with me finding a piece of whole wasabi root in the produce section. Somehow I decided that this should be paired with otoro and blue corn and sesame tortilla chips.

Sushi Grade Nachos

Ingredients

2 ripe avocados
1 bunch scallions, chopped
4 tablespoons freshly grated wasabi root (you can use prepared wasabi paste to taste if fresh is not available)
1 lime, zested and juiced
10 shiso leaves, minced (can use handful of cilantro if shiso is not available)

20 pieces of sashimi (tuna, salmon… whatever is fresh and good)

20 blue corn tortilla chips

Time to make the nachos

Scoop the avocado into a large bowl and mash with the back of a fork. Add in the zest and juice of the limes, wasabi root, and the minced herbs and continue mashing until almost all the chunks of avocado are gone.

Scoop one tablespoon of wasabi guacamole onto each chip and top with a piece of sashimi.

That’s it.

Dark Chocolate Rituals

(“Dark Chocolate Rituals” — a kind of chocolate cookie — is one of three recipes from the first episode of Kitchen Table Gaming, published earlier this week, here on Fetchland.)

I have spent the last few years on a quest to create the most chocolate-y cookie possible. My first efforts with cocoa powder in the batter were fine but they were just not going as far as I needed them to be. I found a way to make them using melted dark chocolate in the batter in addition to a dark chocolate cocoa powder and it was almost there. The missing element was finely ground espresso beans and suddenly the cookie sprang to life.

Dark Chocolate Rituals

Ingredients

1 Cup All Purpose Flour
1/2 Cup Unsweetened Cocoa Powder (I prefer Hershey’s Special Dark)
1/2 teaspoon baking soda
2/3 teaspoon Kosher salt
5 oz dark chocolate for melting
5 oz dark chocolate chunks for… chunks
1 stick unsalted butter (grass-fed butter really makes a difference)
1 1/2 cup granulated sugar
2 large eggs
2 tablespoons finely ground espresso beans
1/2 cup whole espresso beans
1 teaspoon pure vanilla extract

Time to make the cookies

Preheat oven to 325 degrees.

Melt 5 oz. of chocolate with one stick of butter in a double boiler or small metal bowl set over a pan of simmering water. Add espresso powder to as the mixture melts and becomes smooth. Meanwhile add flour, cocoa powder, baking soda, and salt into a bowl. Whisk together and set aside.

Add the chocolate mixture to a stand-up mixer with paddle attachment and add sugar, eggs, and vanilla and mix to combine. With speed turned down to low add the flour mixture in stages until it is all incorporated. Fold in the remaining chunks of chocolate.

Scoop the batter onto parchment or Silpat lined baking sheets with an ice cream scoop. Leave about 2 inches between each cookie. Press 3 or 4 whole coffee beans into the top of each cookie. Bake for 15 minutes and transfer cookies to wire rack to cool.

Makes 2 to 3 dozen cookies depending on how much raw batter you eat.